Saturday, December 16, 2017

Best Dual Battery Relay / Solenoid for Overlanding

Big plans are coming for the Land Cruiser in 2018 and this is one of the first components of the first big project. We waited on the Blue Sea ML-ACR and couldn't resist when the price dropped to $126.  If it is priced under $200 it's a good deal under $160 is great.

Here is a link to the product:


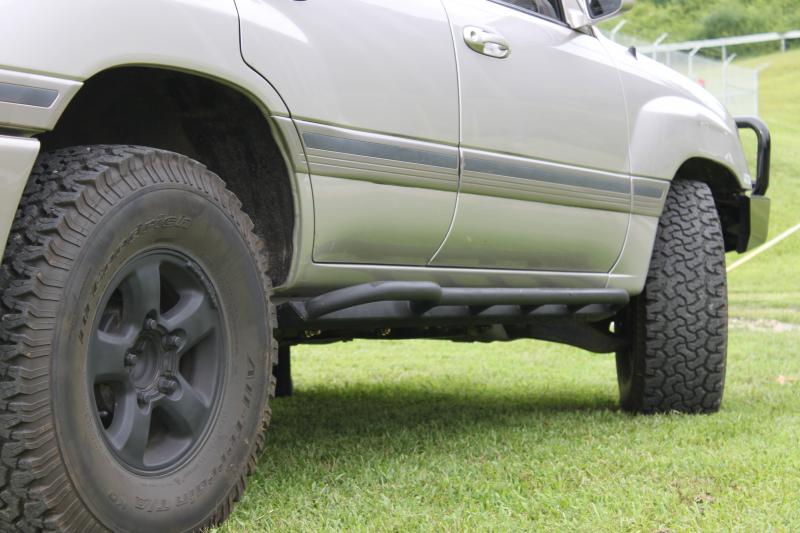
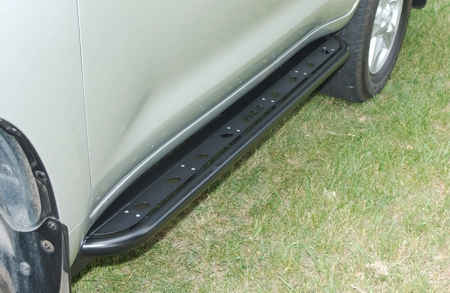
We have been planning the dual battery system and this is the first component to arrive.  These are by far the most robust and intelligent battery relays out there.  There is more to come on our land cruiser 100 series overland expedition 12 volt dual battery system in the very near future so watch out.

Check out our unboxing video!


Check out our video on how we decided to go with this relay over others on the market. We compare T-Max, Blue Sea, IBS, and CTEK options.

Here are the stats on the ML-ACR

ML-ACR Automatic Charging Relay with Manual Control - 12V DC 500A
7622

500 Amp magnetic latching (bi-stable) relay automatically combines batteries during charging and isolates batteries when discharging and when starting engine
Manual control switch provides an added level of safety allowing control with or without power, and offering LOCK OFF capability for servicing
Includes ML-Series Remote Control Contura Switch PN 2146
Automatically manages the charging of two large battery banks
Allows paralleling of battery banks for emergency starting
500 Ampere continuous rating to support high-output alternators
Magnetic Latch (ML)—ACR draws very low current (less than 40mA to monitor terminal voltage) in the "ON" or "OFF" states, and draws moderate current for very short time when changing state
Dual sensing—senses charge on both battery banks
Start Isolation (SI)—can be configured for temporary isolation of House loads from Engine circuit during engine cranking to protect sensitive electronics
Engine Isolation (EI)—can be configured for isolation of two engines while both are running to protect engine electronics and maximize alternator output
Senses charging on two battery banks
LED output to remotely indicate when batteries are combined, isolated, in voltage lockout, or in Start or Engine isolation
3/8"-16 tin-plated copper studs for maximum conductivity and corrosion resistance
7/8" (22mm) stud length accepts multiple cable terminals
Silver alloy contacts provide high reliability for switching live loads
Label recesses for circuit identification

Tuesday, November 21, 2017

This overland Jeep Cherokee will Inspire Your Creativity!

When I stopped at Blue Ridge Overland Gear I not only got the VIP tour but a walk around of Adam's sweet overland Jeep Cherokee.  His rig has two dometic fridge/freezers installed, an RV shower, blue sea dual battery system, batwing/foxwing awning, roof top tent, coleman camp kitchen, DIY bumper with jerry cans, and more.  This beast is expedition ready and has some really cool and unique diy features.  Check it out I think you are really going to enjoy it!


Monday, November 20, 2017

Brady Adventures YouTube Trailer is Here, Finally!

Without further adieu check out our new trailer!

Thanks
Chuck


VIP Blue Ridge Overland Gear Tour

Hey Guys,

Last weekend I was rolling through western Virginia and realized I was passing by Bedford Virginia.  I decided to take a little adventure and head to Blure Ridge Overland Gear's store.  It was opening up right when I arrived and Adam the companies marketing and sales guy gave me an amazing tour of the place.  It was an absolutely beautiful drive and the store was well worth the stop. 

Blue Ridge Overland Gear sells ARB, ALU-CAB, James Baroud, and many other overland products but the real cool stuff is there own in house designed overland organization gear for your rig.  There gear is modular and has tons of Velcro and molle.  These products really bridge the gap between the various adventure communities, from overland to prepper to family camper to hunter, this gear is perfect to take advantage of the dead space in your rig.  Everything is made right there in the shop and it is of the highest quality. 

Check out the tour and be sure to let me know what you think in the comments and subscribe to our channel to keep up with our latest adventures.

Thanks
Chuck


Monday, November 6, 2017

Perfect Overland Wiring Fuse Block

Hey guys,

We love blue see products for our overland wiring applications.  There marine ready quality stands up to whatever offroad punishment you can give it. We have a pretty complete plan for the Land Cruiser that we are getting ready to install and document but in the mean time the Blue Sea Systems ST Blade ATO/ATC Fuse Block with 12 circuits, negative bus and cover is on sale on Amazon for $28.  This is the lowest I have ever seen it.  So if you need one or might need one jump on it while it's this low! I have had my eye on this one for a while. It should easily cover the full needs of my accessories in the land cruiser.

The link price below doesn't always reflect the price on the site click through to see if it's still on sale.


I am going to pair the fuse block with some relays probably get three of these.

and switches. Not sure which switch panel I am going to get.  I expect to have switching in multiple locatoions but was hoping to stick this one where the sunglasses holder is.


and attach it all to the auxiliary battery. 

More to come on this in the very near future.

Saturday, November 4, 2017

A great way to secure your cargo

After finishing up the Land Cruiser overland off-road drawer build we had to decide on a method to secure cargo on top of the drawer.  


We thought about using D-rings in the corners or three on each side and a row in the middle but we all know as your cargo load changes the set locations tend to not be ideal.  


We decided to use Steadymate L-track from US Cargo Control to give us maximum securing flexibility.


There are three main types of L-track, standard, angled, and recessed mount.
Standard is nice because it comes in several powder coated colors.  It is also slightly narrower than the angled track making it ideal when you have tight space considerations.


Recessed is nice because everything could be flush mounted to the drawers.  I would have preferred the recessed mount but was worried about weakening the top of the drawers due to the required mounting depth and I was also concerned that if I wanted to move or change things in the future that would no longer be an option.  


Angled I chose angled since it seemed it would be easier to drag gear over.


End Caps We also installed end caps to ensure no snagging on the ends of the track. Click on the image for current pricing.
41On8iUb1qL.jpg
D-Rings There are many styles of tie down accessories these are the ones we chose to to the rubberized coating and look.  They hold a little less than the all metal options but hold way more than we will ever secure on the drawers. Click on the image for current pricing.
42506-single-stud-fitting-w-round-ring-black_1_375.jpg


Check out this video to check out the install in the land cruiser.


Thanks for stopping by!

Chuck

Monday, October 30, 2017

How to Choose the Best Rock Sliders for Your Rig.

The various rock slider designs you will encounter all have specific pros and cons.  In this post I will cover the main areas of trade off and hopefully get you closer to the right slider for your rig.  The following questions are important to ask yourself before you make your decision.

Are you going to be on the rocks often or is this mainly insurance for less aggressive overlanding?
Do you have kids or less mobile individuals that will be in and out of your rig?
Do you have any specific sliders that you just love the looks of?

Make Sure They're Sliders
When picking a slider the first thing you need to do is ensure that the slider is truly a slider.  Many step bars out there are not designed to support the weight of the vehicle and under that kind of load will buckle.  If all you need is something to get in and out of your vehicle a step rail of this type may be fine for you.

Box Steel and Tube
Depending on the vehicle you have you might only have a few sliders to choose from to over a dozen.  Most sliders are constructed of some sort of box steel that is the main slider protection and tube steel is welded to this to protect the roll pan and side of vehicle.  

Here is a good example of what I am talking about.
There are also sliders that are all box steel but I don't see too many of these.
DOM vs HREW
Not all tubing is created equal.  The manufacturing process determins the strength.  DOM and HREW are choices that some slider manufactures offer others are one or the other.  It is important to know which you are looking at so you are sure to be comparing apples to apples.  Bottom line is DOM is stronger.  If you know you are going to be bashing some rocks or like the peace of mind then DOM is the way to go.

Here is a description I found concerning the differences between DOM and HREW from  (The Steel Tube Institute)

Hot-Rolled ERW (HREW) is rolled into a tube at elevated temperatures. This process produces more malleable (easier to form) tubing, which is not as strong, covered with scale, and not as uniform in dimension as cold-rolled tubing. It is, however, the most inexpensive option.
Cold-Rolled ERW (CREW) follows the same manufacturing process, except at room temperature. Compared to HREW, CREW is stronger because of the improvement in the crystal lattice structure from improved grain size, shape, and orientation. As a result of these characteristics, the finished product is straighter, has a much smoother and more uniform surface finish, and is made to tighter, more consistent dimensions.
Drawn-Over-Mandrel (DOM) tubing basically starts its life as CREW. After shaping, the weld is tested for integrity and cut to length for further processing. The tube gets cleaned and annealed and is then drawn through a series of dies and over mandrels. This reduces the diameter of the tube and thins its walls to the required dimension. Close dimensional accuracy is achieved through tight control of both outside and inside diameters.  Drawing improves the tube’s concentricity, tensile strength, hardness and machinability. The cold-drawing process creates a uniform, precision product with substantially improved tolerances; superior surface finish and tensile strength; increased hardness; and good machinability.

Bump Out vs Straight
A bump out is designed to push the vehicle away from the rock as it reaches the rear of the vehicle.  This can pivot the vehicle and keep the rock from hitting the tire or rear end of the vehicle.  I am sure this can be a positive but not sure how often this will matter.  Probably a nicer feature if you are rock crawling a lot and maybe less of one if your more of an overlander.  However, it does look pretty cool in my opinion.
Angled with Bump Out

Straight without Bump Out

Angled vs Level

Angled sliders give a little more protection a little higher up on the rollpan.  The angle can also serve to slide/picot your vehicle away from a rock. The angled also looks pretty cool in my opinion.  The real advantage of the straight is it is more useful as a stable step surface.  I think angled is the way to go for those that are going to be in more serious rock sliding situations or just like how they look.

Step vs No Step

Whether angled or straight many manufacturers offer diamond plate or a non-skid plate that covers the opening of the rock sliders. This makes the slider more useful as a step.  Some also offer a plate cover just over the bump out.  If you opt for the bump out the open area is easy to slip your foot through which could be pretty nasty.  If you have younger children or for older folks having a non-slip surface without places for you feet to slip into is especially valuable. The only down side to covering the slider that I can think of, is it will be an easy place for mud to accumulate and not necessarily easy to clean up.

Paint vs Powder Coat
Powder coat is a low maintenance highly durable coating until it's not.  Once a slider is slide over some rocks and the coating is cracked or scraped then it will likely be a little bit of a pain to keep nice.  Spray paint won't always bond to the damaged powder coat and sometimes the coating will tend to flake and crack after the initial compromise.  For this reason many opt for spray painting aka rattle caning.  Everytime you hit a rock just pull out your spray can and your good to go.  Again this is a personal choice but if you suspect you will be balancing on rocks every trip then spray canning is the way to go.  If your rock sliders are good insurance for you mild offloading and overlanding powder coating is probably the best choice for longevity.

Mounting style
A few sliders have unique mounting styles that have a U bracket around the frame that allow for max smoothness over rocks.  Most are attached with heavy U-bolts around the frame.  The more mounts the better but in most cases I don't think the differences in mounting are too pronounced to have an impact on your choice.

Cost
I have only looked at sliders for Land Cruisers and 4Runners and seen many for Jeeps in my research.  On the 4Runners there are over a dozen to choose from and maybe many more.  On Land Cruiser 100 series there are maybe a half dozen.  For 100 series land cruisers most sliders are within $100 of each other and about $1000.  For 4Runners I have seen them from $500-$1000.  In the end I suspect you get what you pay for. I would recommend zeroing in on all your other requirements first and making the cost comparison the last step.  We spend so much on our rigs getting the best for your needs is the best route.

Summary
Most of these factors are based on how much you expect to actually be sliding on rocks vs accessibility in your rig.  Answer all the key questions up front and that should help you hone in and a few.  Check reviews and user experiences on forums also.  There is generally tons of helpful info on sites like ih8mud.com or http://www.toyota-4runner.org

A few manufactures I have looked at that get pretty good reviews:

If you have a 4runner this post gives an awesome run down of different brands

Thursday, October 26, 2017

How to use an air down tool and not break the bank!

Hey guys, when you hit the trail one of the most important things you can do is air down your tires.  This will improve traction by extending the footprint of the tire.  It also increases the survivibility of your tire by allowing it to wrap around rocks and sharp obstacles.  In this video we show you how to use an air down tool.  In a future post we will talk air pressures and when to use them.  While we could have gone lower we were only airing down to 28 psi from about 45-50psi.

We are extremely happy with the generic air down tool in the video.  You can get it on amazon for $20 vs the ARB version which is about $40. Here is a link to the one we are using.  Oh by the way the case this one comes in is trash.  Stick the tool in your air tool bag and throw the provide case in the garbage.


Thanks for stopping by!


Tuesday, October 24, 2017

Not the all-terrains I expected!

I have been trying to wear out the tires that came on my Land Cruiser for a year now.  About 6 months ago I picked up some tundra wheels with some off size tires and planned to use them on an off road trailer.


Then a few months ago I saw a set of steel wheels with some bfgoodrich  33" rough terrains on them.  They only had 5-10K left in tread but I figured I could get some use out of them and try out some 33s on the land cruiser.  There are a lot of people out there who prefer steel wheels off road due to their durability.  My opinions on that are evolving but I'll save that for another post.

I headed out to this little tire shop with the stealies for sale with the hopes of making a deal.  The guy at the shop said he usually didn't trade but he was interested.  I agreed to make an even swap if he gave me a deal when I came into get some all-terrains in a few months.  He was happy with that and it was a deal.


While I was there I got some prices on a couple different KO2 sizes.  The owner pulled up some prices on a some Falkin Wildpeak AT3s as well and told me that was what he was recommending.  These were easily going to save me $500 on the set over the BFGoodrich's.  I have used KO2s for the better part of the last 20 years so I was skeptical.  I left that day but did plenty of research on the wildpeaks.  When it comes to the raw stats the wildpeak AT3s and KO2s are nearly identical.  The wildpeaks have a 55K warranty and as far as I can tell youtube reviews are proving out the longevity.  

I wore out the Rough Terrains and headed in for the new set before hunting season and snow in the mountains.  Good to his word the owner gave me a great deal.  The shop is an old country family owned place and is a fun little place to watch in operation.  The man worked as an efficient team.  I had them place my original tires on the stealies as a reserve set and the Falkens back on the alloys.  I took them out to the mountains the very next weekend and they preformed flawlessly.

Here is a video of them being mounted and a little walk around right after they were installed. Check out the Land Cruiser 33" Falken WildPeak AT3Ws!


I'll be sure to let everyone know how they perform down the road but so far I am very happy with them especially considering I can almost get a second set with the money I saved over the KO2s.  Not the all-terrains I expected but a new favorite for me.

If you live in central Virginia and are interested in check out this shop shoot me an email and I will point you to them.  They are worth the visit.

Monday, October 23, 2017

The story of "The Bear and the Beer"

In the video linked below  you'll hear one of many great stories from my dear friend Joe. Joe is more than a friend but a generous teacher who knows and shares more about living in the mountains and off the land than anyone I have ever met. I hope to video many more Joe stories but caught this one and it is one that manages to come up pretty regularly. The bear that is the focus of this story managed to steal about 35 busch and miller lite beers.  After a long search the boys found evidence of a bear beer party.  The pictures below are a few Joe caught of the bear one night on his porch you can see how he ripped off the freezer door looking for treats. I hope you enjoy this story of the bear and the beer and please give us a thumbs up if you do.


Monday, September 18, 2017

Welcome to Brady Adventures!

Hey guys,

We are in the process of getting the blog into our rotation of overland information sharing but right now more of our content is on you tube.  So if you have a minute please stop by our YouTube channel and please subscribe.  We have huge plans for the land cruiser and some exciting trips, gear reviews, and how-to's.  We especially love DIY projects so keep you eyes peeled for our next adventure and thanks for stopping by!

Brady Adventures on YouTube

Chuck